For my daughters birthday I wanted a piñata for the kids to break apart since it seems like the kind of party game that every kid is supposed to have. I had two reservations about having a pinata though:
1) Will it cost a lot?
2) Is it going to take a body builder to break it open: I've seen this happen and the dissappointment
on those kids' faces were just... so sad. :(
What do I do? Look to see if I can make one, of course!
I used eHow.com for my inspiration. eHow.com had paper mache directions that I used, but then I also added my own touch. Here is how I did it:
Step 1: Decide what shape you want and gather your materials:
- news paper
- balloons
- flour
- sauce pot
- salt
- measuring cup
- scissors
- tape
- paint
- Tissue paper
- Bowl
I wanted to make a cute bee hive since a honey bee was the theme of the party. Seems easy enough.
Step Two: Take some of the news paper and tear or cut them into strips. It doesn't matter how nice they look cause by the time they dry, you cant really tell any of them apart.
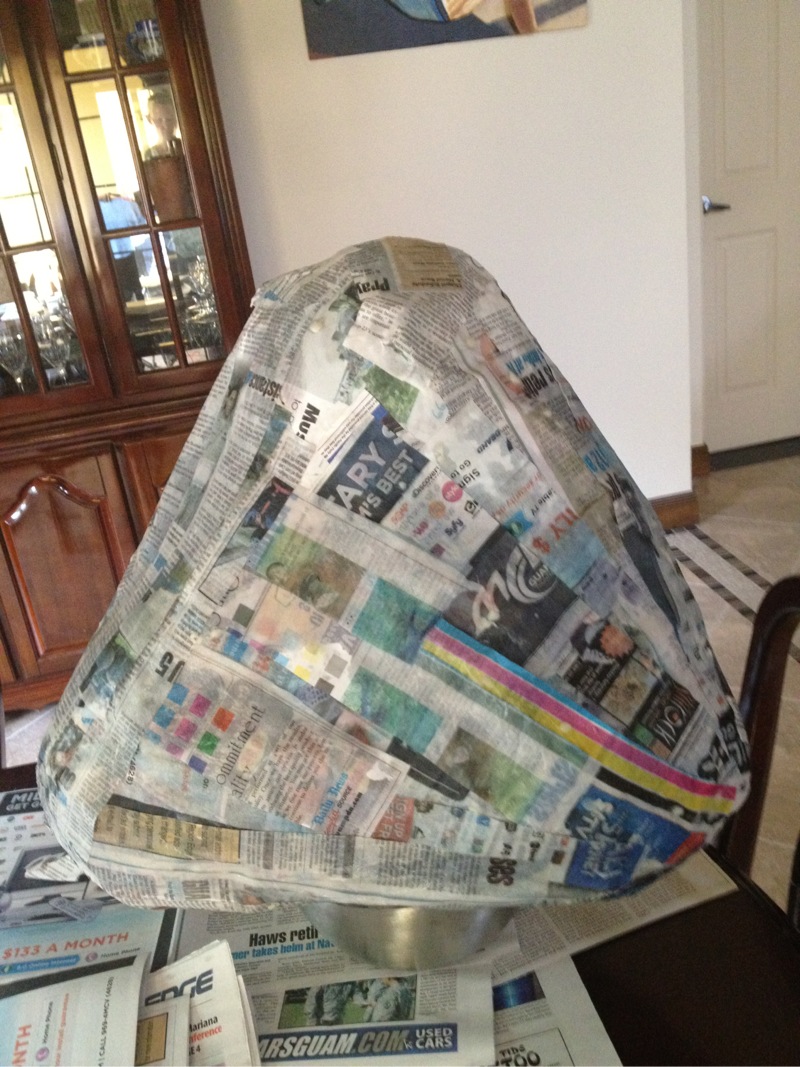
Step Three: Make the piñata design. eHow said to use one balloon but that was too small for me. I wanted something large! So I used 4 balloons.
- I can tell you right now that this was a pretty unstable start to laying down strips of paper so I took large sheets of news paper and covered the balloons using the tape to keep the paper in place, to shape it into what I wanted it to look like.
- It didn't take on the perfect beehive shape, but in the end it worked out quite well.
Step Four: Make the Paste.
- I was not very precise with this. I used about 2/3 cup flour
- poured in some water (probably about a cup and a half)
- let it boil till it was a little thick
- threw in a pinch of salt
- stirred it while it cooled
Step Five: Run the news paper strips through the past and put onto the piñata. This is when you use your bowl. to steady the piñata.
- Make sure your paste is warm and not hot! I burned my fingers a couple of times. Silly me.
- Each strip does not have to have paste globed on. Just a nice even sheen of it.
- I would put one end of the strip in the paste and hold it while with my other hand, put my finger over the paper to make sure that the bottom side of the strip met with the past. Then with the hand holding onto the end of the strip that is in the paste, I lifted it up so that the whole strip would run under my finger catching past on it. Did that make any sense at all? I apologize if it did not.
- After running the strip through the past, I would hold the top with one hand and run my thumb and index finger down the strip to remove any extra paste
- Repeat for the other side to get all pasty
- Apply to the piñata.
- NOTE: I put on 3 layers of large pieces of news paper and 3 layers of the pasted strips. The weight of the newspaper kind of made it sag down so I didn't do more than that.
Step Six: Wait for piñata to dry. This may take a while depending on how many layers and how much paste you used. Mine took about 2 days but it was also under an AC unit.
Step Seven: Paint the piñata.
- It would be best if you got a primer but I didn't have any and thought that 2 coats would be enough. Wrong! You can see in the picture that even with two coats, you could still see the newspaper. Super Lame! I'm not spending any more money on this thing so I've decided to cover it with tissue paper.
Step Eight: Cut hole at top. I did mine just big enough to put in toys candy and a child's hanger.
Now... if you did it right... you don't have to use tissue and could just paint it so step nine is not required!
Step Nine: Put tissue paper on it.
- If I had put primer on it then I wouldn't have had to spend so much time with the tissue. I could have just cut out squares and pasted them on but because you could see all the news paper, I had to add an enormous amount of tissue paper! I do believe that it worked out to my favor though.
- Cut out two by two inch squares of tissue
- take one square and wrap it around your finger (put index finger in middle of square and squish the rest of the tissue upwards around it).
- dot your finger (with the tissue still on it) into the paste and place it on the piñata however you want.
 |
| This took some time but I enjoyed it. |
 |
| Every party item I bought was yellow black and white polka dotted |
 |
| By this point I was about to pull out my hair and you can see the white hadn't been added yet. |
Step Ten: Put in candy, toys and child's hanger.
- I did not fasten the child's hanger to it
I was so nervous to have the kids play with it. Would it break too easily? Would it take a muscle man to break it? Will the hanger break off before the kids can break it? ect ect ect...
It was perfect. All the kids got a chance to hit it. It didn't take an adult to break it open. The hanger did not break and was perfect for hanging on a pole since I did not have a tree.
I got a lot of compliments (even though I felt it was kind of a fail), and to say that I made it, felt pretty good too.
Yeah, I am kind of a dumb dumb because I never took a picture of it before it got killed by the kiddos.
Yeah, I am kind of a dumb dumb because I never took a picture of it before it got killed by the kiddos.
As for the cost:
News paper - free
Flour - $1.50
Salt $1
Tissue paper $2 (bought it at a store where a bunch of it was only a dollar! Good Deal)
Paint $2.50 (Home Depot sample size and technically it was left over from when I painted something else)
This does not include the stuff I put in it
This does not include the stuff I put in it
Total: $7
Time it took to make it? A LOT
Was it a nail or a fail?
NAIL and FAIL
I would say NAIL because it was only $7 to make but a FAIL when it came to how much time it took. So if you like to be crafty then I totally recommend it. If you need something quick and just don't have the time, then buy one cause you can get them as cheap as $15 GOOD LUCK!!
No comments:
Post a Comment