Showing posts with label bee. Show all posts

Wednesday, July 13, 2016

Piñata AWESOMENESS

For my daughters birthday I wanted a piñata for the kids to break apart since it seems like the kind of party game that every kid is supposed to have.  I had two reservations about having a pinata though:

1)  Will it cost a lot?
2)  Is it going to take a body builder to break it open:  I've seen this happen and the dissappointment
     on those kids' faces were just... so sad.  :(

What do I do?  Look to see if I can make one, of course!

I used eHow.com for my inspiration.  eHow.com had paper mache directions that I used, but then I also added my own touch.  Here is how I did it:

Step 1: Decide what shape you want and gather your materials:
  • news paper
  • balloons
  • flour
  • sauce pot
  • salt
  • measuring cup
  • scissors
  • tape
  • paint
  • Tissue paper
  • Bowl
I wanted to make a cute bee hive since a honey bee was the theme of the party.  Seems easy enough.


Step Two:  Take some of the news paper and tear or cut them into strips.  It doesn't matter how nice they look cause by the time they dry, you cant really tell any of them apart.

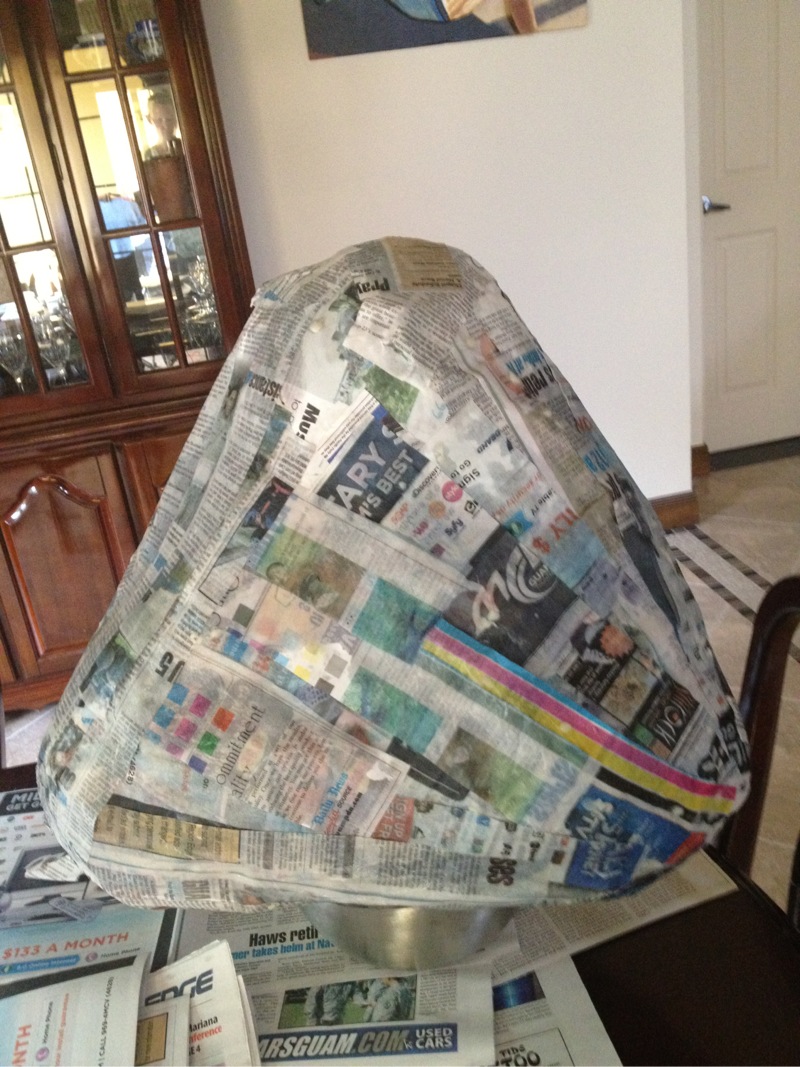
Step Three:  Make the piñata design.  eHow said to use one balloon but that was too small for me.  I wanted something large!  So I used 4 balloons.
  • I can tell you right now that this was a pretty unstable start to laying down strips of paper so I took large sheets of news paper and covered the balloons using the tape to keep the paper in place, to shape it into what I wanted it to look like.  
  • It didn't take on the perfect beehive shape, but in the end it worked out quite well.


Step Four:  Make the Paste.
  • I was not very precise with this.  I used about 2/3 cup flour
  • poured in some water (probably about a cup and a half)
  • let it boil till it was a little thick
  • threw in a pinch of salt
  • stirred it while it cooled
NOTE: Since it thickens when it cools, don't let it get too pasty when it is hot


Step Five:  Run the news paper strips through the past and put onto the piñata.  This is when you use your bowl.  to steady the piñata.
  • Make sure your paste is warm and not hot!  I burned my fingers a couple of times.  Silly me.
  • Each strip does not have to have paste globed on.  Just a nice even sheen of it.
  • I would put one end of the strip in the paste and hold it while with my other hand, put my finger over the paper to make sure that the bottom side of the strip met with the past.  Then with the hand holding onto the end of the strip that is in the paste, I lifted it up so that the whole strip would run under my finger catching past on it.  Did that make any sense at all?  I apologize if it did not.
  • After running the strip through the past, I would hold the top with one hand and run my thumb and index finger down the strip to remove any extra paste
  • Repeat for the other side to get all pasty
  • Apply to the piñata.
  • NOTE:  I put on 3 layers of large pieces of news paper and 3 layers of the pasted strips.  The weight of the newspaper kind of made it sag down so I didn't do more than that.


Step Six:  Wait for piñata to dry.  This may take a while depending on how many layers and how much paste you used.  Mine took about 2 days but it was also under an AC unit.

Step Seven:  Paint the piñata.
  • It would be best if you got a primer but I didn't have any and thought that 2 coats would be enough.  Wrong!  You can see in the picture that even with two coats, you could still see the newspaper. Super Lame!  I'm not spending any more money on this thing so I've decided to cover it with tissue paper.


Step Eight:  Cut hole at top.  I did mine just big enough to put in toys candy and a child's hanger.

Now... if you did it right... you don't have to use tissue and could just paint it so step nine is not required!

Step Nine:  Put tissue paper on it.
  • If I had put primer on it then I wouldn't have had to spend so much time with the tissue.  I could have just cut out squares and pasted them on but because you could see all the news paper, I had to add an enormous amount of tissue paper!  I do believe that it worked out to my favor though.
    • Cut out two by two inch squares of tissue
    • take one square and wrap it around your finger (put index finger in middle of square and squish the rest of the tissue upwards around it).
    • dot your finger (with the tissue still on it) into the paste and place it on the piñata however you want.


This took some time but I enjoyed it.

Every party item I bought was yellow black and white polka dotted

By this point I was about to pull out my hair and you can see the white hadn't been added yet.

Step Ten:  Put in candy, toys and child's hanger.
  • I did not fasten the child's hanger to it
I was so nervous to have the kids play with it.  Would it break too easily?  Would it take a muscle man to break it?  Will the hanger break off before the kids can break it?  ect ect ect...

It was perfect.  All the kids got a chance to hit it.  It didn't take an adult to break it open.  The hanger did not break and was perfect for hanging on a pole since I did not have a tree.

I got a lot of compliments (even though I felt it was kind of a fail), and to say that I made it, felt pretty good too.

Yeah, I am kind of a dumb dumb because I never took a picture of it before it got killed by the kiddos.

As for the cost:

News paper - free
Flour - $1.50
Salt $1
Tissue paper $2 (bought it at a store where a bunch of it was only a dollar!  Good Deal)
Paint $2.50 (Home Depot sample size and technically it was left over from when I painted something else)
This does not include the stuff I put in it

Total:  $7
Time it took to make it?  A LOT

Was it a nail or a fail?  
NAIL and FAIL
I would say NAIL because it was only $7 to make but a FAIL when it came to how much time it took.   So if you like to be crafty then I totally recommend it.  If you need something quick and just don't have the time, then buy one cause you can get them as cheap as $15  GOOD LUCK!!

Tuesday, November 13, 2012

Cake Bossette

I watch a lot of those food shows where people make those really cool cakes.  I decided that I wanted to have a really cool cake for my daughters birthday party.

As I have mentioned before, her theme was a honey bee so I wanted to have some kind of bee or beehive cake.

I have a friend who makes beautiful cakes so I asked her about it and she offered a cake to make for me but... for $85.  *Le Sigh*  This is actually a REALLY great price for the cuteness of the cake but I had a hard time willing to spend that much on a cake.

Now remember, I am not a baker.  I am an average Joette who has never done this before and seeing if this is something that a regular average person can do!

Where to start?  I started making a list of what I would need if I wanted to make it myself:
  • Cake mold
  • Cake mix (including the ingredients)
  • Frosting
  • Food coloring (optional)
  • Sugar molds (optional)
  • Fondant
  • Powdered sugar
  • Cake icing tip (mine was called star even though it wasn't five points)
  • Cake icing bag (those triangle things you see bakers squeezing frosting out of)
  • coupler; the plastic thing that holds the icing bag to the icing tip without frosting oozing everywhere.
  • Tall cup/drinking glass/mug

Okay, so now that I have an idea of what I need, what do I do now?  Go to Amazon:
  • The first thing I did was go to Amazon.com to see what kind of cake molds were out there.  I found one of a beehive.  $30 hmmm, kind of expensive but lucky me, I have a gift card from my family.  I think I still would have bought it even if I didn't have the gift card.  Now I can keep it for the rest of my life and possibly give it to my daughter for when she has kids!  Saves her money.
  • Next, I looked for cute little bee decorations and found that you can buy sugar molds for cheap and in pretty much any kind of thing you want it.  The only problem I ran into was the packaging.  There was one company that claimed that you should be worried about good packaging.  They claimed that if you did not have good packaging that you would receive your sugar molds in pieces.  They were charging $7 for 12 bees.  Another company was charging $5 for 24 bees but did not mention anything about their packaging so I did get worried.  I ordered both.  Once I received the bees in the mail, the first company did an extremely good job packaging the bees.  None of them broke BUT the second company threw all the bees into a little plastic bag and none of them broke either.  So I am suspecting that as long as there are no easily breakable features on the moldings then don't worry about the packaging.   My bees were pretty much a circle with nothing sticking out so they were fine.
  • Last, on Amazon, I bought black food dye.  $7 for a huge thing of it so I will never have to buy black dye food coloring again.  EVER.


Then I went to the store and bought 2 boxes of cake mix (classic yellow), 3 containers of frosting (2 white, 1 chocolate), eggs, veggie oil (following cake mix directions) and fondant.  $14.

Once I figured out what I needed (and got it) it was time to go and make my cake!

I used 2 boxs of cake mix.  1 for each side. 
Step One:  Make the cakes.  I  realized that the cake mold I bought was kinda small.  Very small in fact and would only feed probably about 20 people when I was going to have about 50 people at the house.  How do I solve this.... hmmmm...  I KNOW!  I pulled out my 9 inch round cake pans (happen to have them from making homemade pizzas).  It actually didn't really matter to me if they were round, square, 9 inches, 10 inches or whatever.  Just something that would look okay and feed more people.  I obviously had to buy more cake mix and frosting.


Then I removed the excess.

Step Two:  Remove any excess cake.  You can see the picture of what I mean above but when it came to the round cakes it was a little more difficult.  You want your cakes to be flat so if you pull your cake out of the oven and there is a huge dome then you have to cut it off as best as you can so that they are flat and level.

Step Three:  Put the pieces together.  I have a total of 4 cake pieces; 2 round ones and 2 halves of a bee hive.  
  • I take one of the round ones and frost the top with icing (I used the white frosting).  
  • Then I add the second round one to the top (with the cut part facing down).  
  • I then frosted those two pieces like normal.   
  • Now for the bee hive.  Before putting the pieces on the round cake I frosted the middle parts and put them together before putting them on top of the cake.  
  • They didn't really want to stay together so I had to frost the whole thing real quick and then put them in the fridge to chill and that seemed to work with keeping everything together.
Step Four:  Roll out the fondant and make black frosting.  
  • RULE:  DO NOT ROLL OUT THE FONDANT UNTIL YOU ARE READY TO PUT IT ON THE CAKE.  I did not do this and let it sit so it dried out and was unusable.  Super sad that I had to buy more.  
  • To make black frosting, you need the chocolate frosting and only a few drops of the black dye.   I am an idiot and used white frosting the first go around and couldn't figure out why my frosting was turning out purple.  My cake friend told me to use chocolate.  Duh... I should have figured that one out but I didn't.
  • NOTE: if your frosting is too runny then add powdered sugar to thicken it up.
  • Now roll out your fondant.  Mine came in a square and I had to put powdered sugar on the counter to roll it out.  
Step five:  Put the fondant on.
  • At first I rolled it out too thin and it tore to pieces so I had to ball it up and try again.  Once I got it big enough to where it might fit, but not see through, I knew it was good to go.
  • Next I pulled the cake out from the fridge and put dots of new frosting on (since the frosting on it was now chilled therefore a little hard) to act as glue for the fondant.
  • Wrap the fondant around the cake like a blanket.  This was a pain in the @##!  I am not sure if it was because my cake was round but after a little bit of time, I managed to cover, cut off the extra and tried to work the seams so that you couldn't tell they were there.  It was not perfect but I figured I would cover them with bees.
  • Pat the fondant so that it takes the shape of the mold.
Step six: Add frosting and sugar molds
  • Take the cake icing bag and cut the tip off (bottom of the V)
  • unscrew the coupler so that there are two pieces
  • Take the larger part of the coupler and put together with the frosting tip and insert into bag so that the frosting tip is sticking out of the hole
  • Screw the second piece of the coupler onto the first part (over the plastic)
  • Put frosting into the frosting bag.  The best way to do this is to get a large cup, insert the bag (with the tip at the bottom of the cup) and fold over the top plastic part so that it is easy to get the frosting down to the bottom without creating too many air pockets
  • Once you have enough frosting in it, twist the top and start making little stars.
  • I put a little star in a spot where I wanted a bee and found that the frosting was perfect to glue the sugar moulds onto the cake.
I would give it a few practice squirts so that you can get the look that you want

So here is the cake that I made:


Anyone who saw it in person thought it was amazing.  

How much did I spend?  er...   well, lets find out:

Cake mix: 4 boxes @ .99 ea = ~$4
Frosting: 3 containers @ .99 ea = $3
Dye = $7
Bees = $12
Fondant = $7

Total:  $33

Not bad but if I hadn't had the gift card or most of the mentioned items, it would have been:

Same as above = $33
Cake mold = $30
Icing bag, coupler and star = ~$10
Powdered Sugar = $2
Veggie oil = $3
Eggs = $1.50

I hope this is okay but I am going to assume that everyone has a cup.

Total:  $79.50

BAM!!!  Still cheaper 

Remember:  This took me a bit of time and let me tell you it would have been nice to have the extra time for something else AND to have someone else worry about it. At least I have left over bees, dye, cake mold and a better knowledge of fondant for a future cake!


Tuesday, October 23, 2012

Tutu For You Too


No Sew Tutus that I found on YouTube loaded by Wowzzydotcom.

This is awesome!! 

Let me give you a little background information as to why I wanted to learn how to make a tutu for my baby girl.

I have a friend who is trying to adopt.  She is about to get her kiddos and I am so happy for her BUT the process was hard and there was a lot of money to be spent.

How do you raise money?  But a fundraiser of course!!  They had a few fundraisers and one of those fundraisers was a raffle!  Who doesn't love a raffle?  So I put in a little to help out.
Well...  I actually won something!  I couldn't believe it.  I never win anything!!  I was so excited, I won a $20 gift certificate to a super cute little business that makes tutu's.  I thought it was a great win until I looked at the prices.  

Please don't get me wrong.  I support mom and pop businesses because I grew up on the income of a self employed parent that relied solely on those who support those kinds of stores.  So, instead of buying from this store, I supported the mom and pop store in my area that supplies the items needed to make a tutu.  As for the gift certificate, I let someone else win it.

The first thing I did was google 'How to make a tutu'.  The first thing that came up was the video on YouTube I mentioned above.  "Julie Figueroa shows you how to make a tutu for a little girl. This method can also be used to make an adult tutu." Wowzzydotcom.  It's great!  Super easy instructions and it's not hard to do.  It does take time though.

My daughters birthday was coming up when I was making this.  Her theme since she was born has been honey bees.  So, for her birthday I made a tutu that was white black and yellow.  I then made a headband that had two antennas and used the scrap black and yellow pieces of tulle for between the antennas. 

Just to reiterate the instructions that are on the video:


  1. You need the following items:
    • Ribbon
    • Tulle
    • Scissors
    • Ruler (if you want to get that technical which I did not)
  2. Measure out the length of ribbon needed to go around the little girls waist.
  3. Tie a knot at each end of the waist measurement and add 20 inches to each side.
  4. Cut your tulle.  You may have to work a little bit differently than Julie shows you so, let me give you some tips:
  5. You can see the spool there on the left.  10 pieces that are each 10 inches long and in as even pile as can be.

    Roll the tulle starting at the short end so it looks like this.

    I did not make my pieces 3" wide but 2 inches.  Worked just fine.
    • Cut out 10 pieces that are 10 inches long unless you want them longer (If you want the tutu to be 6 inches long then you will want to cut out 12 inch pieces)
    • Evenly stacked them
    • Rolled it up (short side not long ways)
    • Cut off the edges
    • Cut the middle.  This will give you 20 pieces of tulle to put on your ribbon
  6. Next you will attach each piece of tulle to the ribbon.  You do this by:
    • Folding the piece of tulle in half
    • Tie it to the ribbon by making the folded part a loop and putting the two end pieces through the loop
  7. Do that with all the tulle pieces till you have a tutu!
  8. I also trimmed the edges to make sure that all were even.
The tutus are really cute and when my daughter wore hers to her birthday party, she got a million compliments.  I am sorry but I was so busy at the party that I never got a moment to take any pictures. Boo.

This is how I used the scrap pieces: